





2 profession quests Warsmith
Warsmith - the crafter. The most essential class in Lineage 2; without them other players would not get equipment and consumables. This class is also needed in sieges, because it has skills that summon a "battering ram" that helps make a breach in the wall.
Warsmith leveling planner: what to do at each level — quests, grade, where to level
Mark 1 quest 35+ Trial of the Guildsman
Mark 2 quest 37+ Testimony of Prosperity
Mark 3 quest 39+ Test of the Maestro
Download the Warsmith class transfer walkthrough 3 in 1 at level 39-40
Quest 35+ Trial of the Guildsman
Name: Trial of the Guildsman
Level: 35+
Repeatable: No
Starting location: Giran Castle Town
Starting NPC: Warehouse Keeper Valkon
Reward: Mark of Guildsman
 1. Quest Trial of the Guildsman starts in Giran Castle Town. In the warehouse, look for Warehouse Keeper Valkon, he gives you
 Valkon's Recommendation
 2. Teleport to Talking Island Village. In the square, look for the blacksmith Blacksmith Altran. After talking to the blacksmith, return to Giran Castle Town to Warehouse Keeper Valkon
 3. Teleport to Town of Dion Run to Execution Grounds. In the pit near the catacombs, hunt Mandragora Blossom until you get
 Mandragora Berry. After getting the required item, return to Talking Island Village. In the square, look for the blacksmith Blacksmith Altran. He gives you Altran's Instructions, Recipe: Journeyman Ring, Altran's 1st Recommendation, Altran's 2nd Recommendation. Add the recipe to your recipe book; you will need to craft this item later.
 4. Teleport to Gludin Village. In the warehouse, look for Warehouse Keeper Norman, he gives you
 Norman's Receipt and
 Norman's Instructions
 5. Teleport to Town of Gludio. In the smithy, look for Blacksmith Pinter, he gives you
 Pinter's Instructions and
 Recipe: Amber Bead. Add this recipe to your recipe book, like the previous one.
 6. Teleport to The Ant Nest. Hunt Ant and Ant Captain until you get
 70 Amber Lump. From the monsters you will get Amber Lump, from which
 Amber Bead is crafted. After getting the required items, 70 pcs., return to Blacksmith Pinter in Town of Gludio. He gives you 7 Journeyman Deco Beads
 7. Teleport to Hunters Village. In the smithy, look for Blacksmith Duning , he gives you
 Duning's Instructions
 8. Teleport to Giran Castle Town. Teleport to Breka's Stronghold. Hunt Breka Orc (any) until you get
 30 Duning's Key. After getting the required items, return to Hunters Village. In the smithy, look for Blacksmith Duning 9. Return to Gludin Village. In the warehouse, look for Warehouse Keeper Norman, he gives you
 Norman's List. Teleport to Town of Dion. Run to Execution Grounds.
 Hunt Granite Golemuntil you get
 70 Granite Whetstone
 Hunt Ghouluntil you get
 70 Gray Bone Powder.
 Hunt Dead Seekeruntil you get
 70 Red Pigment
 10. Teleport to Town of Dion Teleport to Plains of Dion. Near Monster Race Track hunt Silenos (Faun Lv. 30)until you get
 70 Braided Yarn. After getting the required items, return to Gludin Village to Warehouse Keeper Norman, who is in the warehouse. He gives you
 7 Journeyman Gem. Now you need to get 70 Crystal (D-grade) and craft
 7 Journeyman Ring 11. Return to Giran Castle Town. In the warehouse, look for Warehouse Keeper Valkon, he gives you the reward and
 Mark of Guildsman
The Trial of the Guildsman quest is complete
2 profession quest for Warsmith 37+ Testimony of Prosperity
Name: Testimony of Prosperity
Level: 37+
Repeatable: No
Starting location: Giran Castle Town
Starting NPC: Warehouse Keeper Parman
Reward: Mark of Prosperity
 1. Quest Testimony of Prosperity starts in Giran Castle Town. In the warehouse, look for Warehouse Keeper Parman. He gives you 1st Ring of Testimony
 2. Teleport to Town of Dion. At the town exit, look for Guard Bright. He gives you
 Bright's List 3. Run to Execution Grounds. In the pit near the catacombs, hunt Mandragora Blossomuntil you get
 20 Mandragora Petal.
 4. Return to Town of Dion. Teleport to Cruma Tower. Near the tower, hunt Giant Crimson Ant, until you get
 10 Crimson Moss. After getting the required items, return to Town of Dion. At the town exit, look for Guard Bright, he gives you
 Mandragora Bouquet
 5. Near the guard, look for Emily, she gives you Emily's Recipe
 6. Teleport to Talking Island Village. In the warehouse, look for Warehouse Keeper Wilford You need to get
 Crystal Brooch; to do this, choose the answer An Elf more than 1,000 years old
 7. There in Talking Island Village near the church, look for Lilith, she gives you
 Lilith's Elven Wafer.
 8. Teleport to Gludin Village. Teleport to Orc Barracks. At the ranch, look for Piotur, he gives you
 Blessed Seed.
 9. Teleport to Dvarven Village. Run to the main building and talk to Iron Gate's Lockirin Silver Scale's Balanki Black Anvil's Arin Bronze Ley's Keef Golden Wheel's Spiron Gray Pillar's Filaur - they are all in the same building.
 10. Run to the grocery store and look for Trader Mion. She gives you
 Contribution of Mion
 11. Behind the warehouse, look for Carrier Torocco, he gives you Procuration of Torocco
 12. Near the town exit, look for Maryse Redbonnet, she gives you Maryse's Request. Now you will need
 100 Animal Skin. After you find the leather, return to Maryse Redbonnet. She gives you Contribution of Maryse
 13. In the weapon and armor shop, look for Trader Shari, she gives you Contribution of Shari.
 14. Run toward Strip Mine and look for Miner Bolter, he gives you
 Receipt of Bolter
Spawn points of Master Toma.
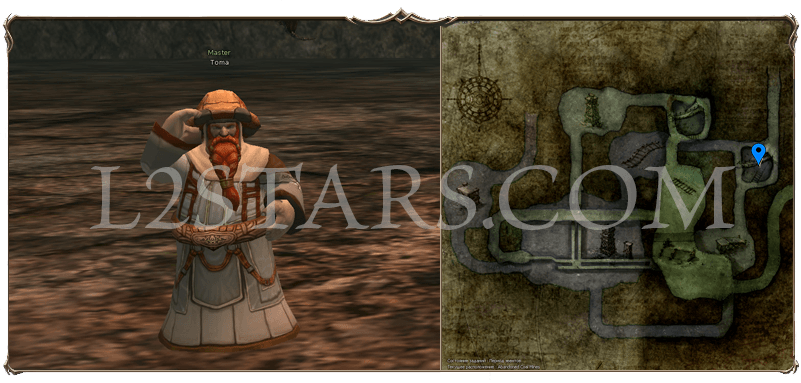 Now you need to find Master Toma and talk to him about the quest. Master Toma can be at one of three points on the map. He moves between them every 30 minutes. He can appear at the same point several times. We advise you to keep moving between these points rather than waiting at one. Below is a map of his movements.
 Starting from the north of the map, on a small island. Teleport to The Northeast Coast and run north on the map. You have to swim to the island. The second point is near the northern entrance to Mithril Mines; in this case, after the teleport run to the dungeon entrance, where Toma should be standing. The hardest point is deep inside Abandoned Coal Mines. To get there, teleport to Entrance of Adandoned Coal Mines, go inside and run deep in, killing mobs that get in the way. He gives you Contribution of Toma 15. Return to Dvarven Village. In the main building, talk to Iron Gate's Lockirin, Gray Pillar's Filaur, Golden Wheel's Spiron, Bronze Ley's Keef, Black Anvil's Arin - they are all in the same building. 16. Teleport to Giran Castle Town. In the warehouse, look for Warehouse KeeperParman. He gives you Parman's Letter and 2nd Ring of Testimony. Now you will need 10 Crystal (D-grade)
 17. Teleport to Town of Dion. Teleport to Cruma Tower. In the swamp, look for Maestro Nikola, he gives you
 Clay Dough
 18. Run to Cruma Tower. Run down, then right, then left all the way, and left once more. Look for Box Of Titan; you get Pattern of Keyhole. After getting the required item, return to Maestro Nikola; he gives you Nikola's List and Recipe: Titan Key. Add the recipe to your recipe book; you will need it later.
 19. Near Cruma Tower hunt Marsh Spideruntil you get
 10 Spider Thorn
 20. Near Cruma Tower hunt Toad Lorduntil you get
 10 Toad Lord Sac
 21. Near Cruma Tower hunt Marsh Stakatountil you get
 20 Stakato Shell. After getting all the required items, return to Box Of Titan. Make the key, open the chest and get
 Maphr Tablet Fragment 22. Return to Giran Castle Town. In the warehouse, look for Warehouse Keeper Parman, he gives you the reward and
 Mark of Prosperity.
Quest Testimony of Prosperity is complete
2 profession quest for Warsmith 39+ Test of the Maestro
Name: Test of the Maestro
Level: 39+
Repeatable: No
Starting location: Dwarven Village
Starting NPC: Iron Gate's Lockirin
Reward: Mark of Maestro
1. Quest Test of the Maestro starts in Dwarven Village. In the main building, look for Iron Gate's Lockirin. 2. Right there, talk to Gray Pillar's Filaur, he gives you Architecture of Cruma.
 3. Teleport to Town of Dion. Teleport to Cruma Tower. To the right of the tower entrance, behind the rocks, look for Researcher Lorain, she gives you Ingredients of Antidote
 4. Near the tower, hunt Giant Mist Leechuntil you get
 10 Blood of Leech
 5. Near the tower, hunt Stinger Waspuntil you get
 10 Marsh Spider's Web 6. Near the tower, hunt Marsh Spideruntil you get 10 Marsh Spider's Web. After getting the required items, return to Researcher Lorain, she gives you Report of Cruma. Return to Dvarven Village and in the main building look for Gray Pillar's Filaur, he gives you
 Recommendation of Filaur. Right there in the building, talk to Silver Scale's Balanki.
 7. In the northern part of the town, look for Chief Croto, he gives you Paint of Kamuru.
 8. Teleport to Orc Village. Teleport to Cave of Trials. Look for Jailer Dubabah. See his location in the picture above.
 9. Nearby lies the corpse of Corpse Of Kamur, go up to it.
 10. In the same cave, kill the quest monster Evil Eye Lord and get
 Necklace of Kamuru. After getting the necklace, return to Dvarven Village to Chief Croto. Run to the main building to Silver Scale's Balanki, he gives you Recommendation of Balanki. Right there, talk to Black Anvil's Arin, he gives you Paint of Teleport Device.
Spawn points of Master Toma.
11. Now you need to find Master Toma and talk to him about the quest. Master Toma can be at one of three points on the map. He moves between them every 30 minutes. He can appear at the same point several times. We advise you to keep moving between these points rather than waiting at one. Below is a map of his movements. Starting from the north of the map, on a small island. Teleport to The Northeast Coast and run north on the map. You have to swim to the island. The second point is near the northern entrance to Mithril Mines; in this case, after the teleport run to the dungeon entrance, where Toma should be standing. The hardest point is deep inside Abandoned Coal Mines. To get there, teleport to Entrance of Adandoned Coal Mines, go inside and run deep in, killing mobs that get in the way. 12. In the mountains, hunt King Bugbearuntil you get
 Broken Teleport Device. After getting the required item, return to Master Toma (how to find him is described above). He gives you
 5 Teleport Device. Return to Dvarven Village, run to the main building and look for Black Anvil's Arin, he gives you Recommendation of Arin. 13. Right there in the main building, talk to Iron Gate's Lockirin. He gives you the reward and
 Mark of Maestro
The Test of the Maestro quest is complete
When you reach level 40 and have all three marks required to get the
2 profession of Warsmith (Warsmith) Go to Head Blacksmith Kusto, who is in the smithy in
Giran Castle Town. And get the 2 profession: Warsmith

